
Ajouter plusieurs fournisseurs d'authentification unique à Genesys Cloud
- Single Sign-on > Provider > Add, Delete, Edit, and View permissions
- rôle administrateur dans le compte fournisseur d’identité de votre organisation
- Une seule adresse électronique pour le compte du fournisseur d'identité et Genesys Cloud.
- Métadonnées de votre fournisseur d'identité
- Un certificat public codé de votre fournisseur d'identité
Genesys Cloud vous permet de configurer jusqu'à 30 intégrations d'authentification unique (SSO) avec le même fournisseur d'identité ou un mélange de fournisseurs d'identité. Pour vous aider à créer vos intégrations SSO, Genesys Cloud vous permet de importer un fichier de métadonnées SAML que vous recevez de votre fournisseur d'identité. L'importation d'un fichier de métadonnées SAML, qui contient les détails de configuration et les informations relatives au certificat, remplit automatiquement les champs nécessaires dans l'intégration.
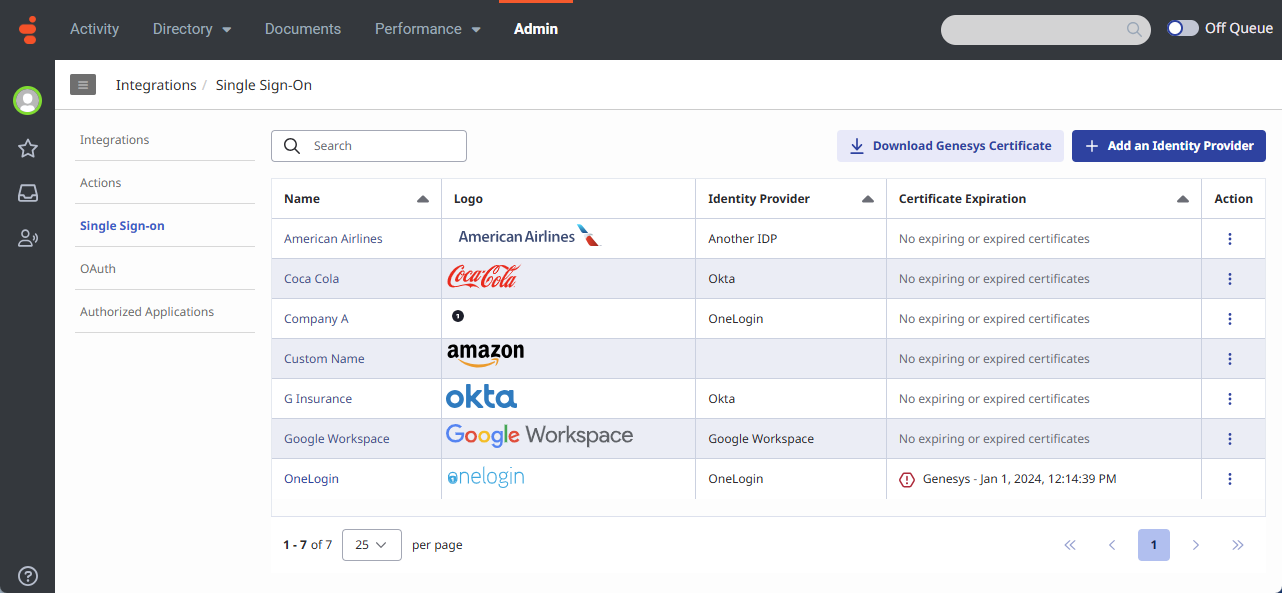
Page d'authentification unique
Pour suivre plusieurs intégrations SSO, Genesys Cloud affiche les intégrations sous forme de liste sur la page Single Sign-On. La page fournit un résumé de chaque intégration, y compris le nom de connexion, le logo, le fournisseur d'identité et les détails de l'expiration du certificat. Dans la colonne Action, cliquez sur More pour afficher un menu qui vous permet de modifier et de supprimer une intégration. Sur les en-têtes de colonne Nom, Fournisseur d'identité et Expiration du certificat, cliquez sur Sort pour réorganiser la vue dans l'ordre croissant ou décroissant.
La page propose également des options permettant d'ajouter un fournisseur d'identité et de télécharger un certificat Genesys. Pour envoyer un certificat Genesys à un fournisseur d'identité, cliquez sur Télécharger le certificat Genesys.
Cliquez sur l’image pour l’agrandir.
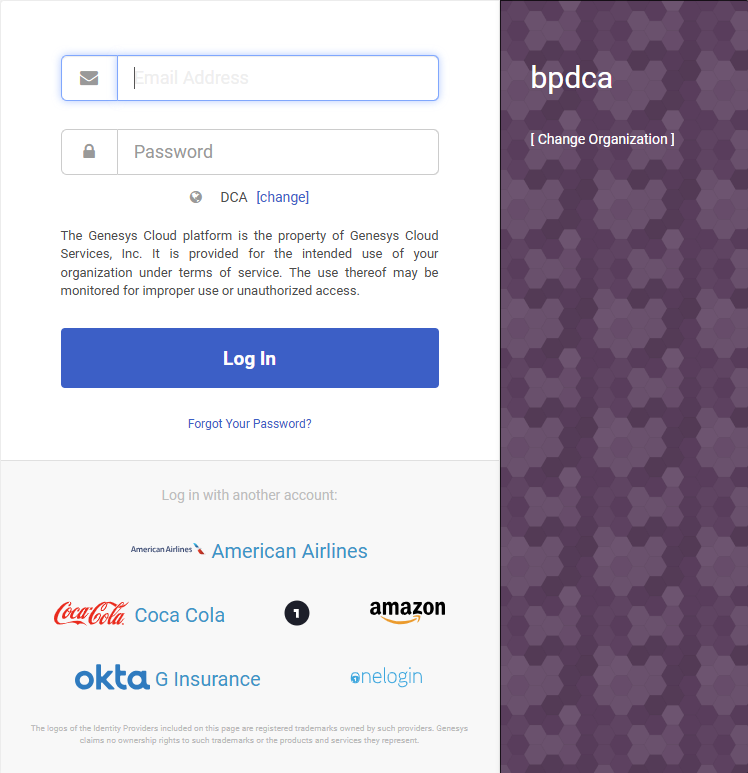
Personnaliser l'écran de connexion pour chaque intégration SSO
Vous pouvez personnaliser l'affichage de chaque intégration SSO avec un nom de connexion différent et un logo de votre choix. Vous pouvez choisir d'afficher le nom ou le logo, ou encore le nom et le logo. Le choix que vous faites détermine la façon dont l'intégration SSO s'affiche sur la page de connexion Single Sign-On et Genesys Cloud.
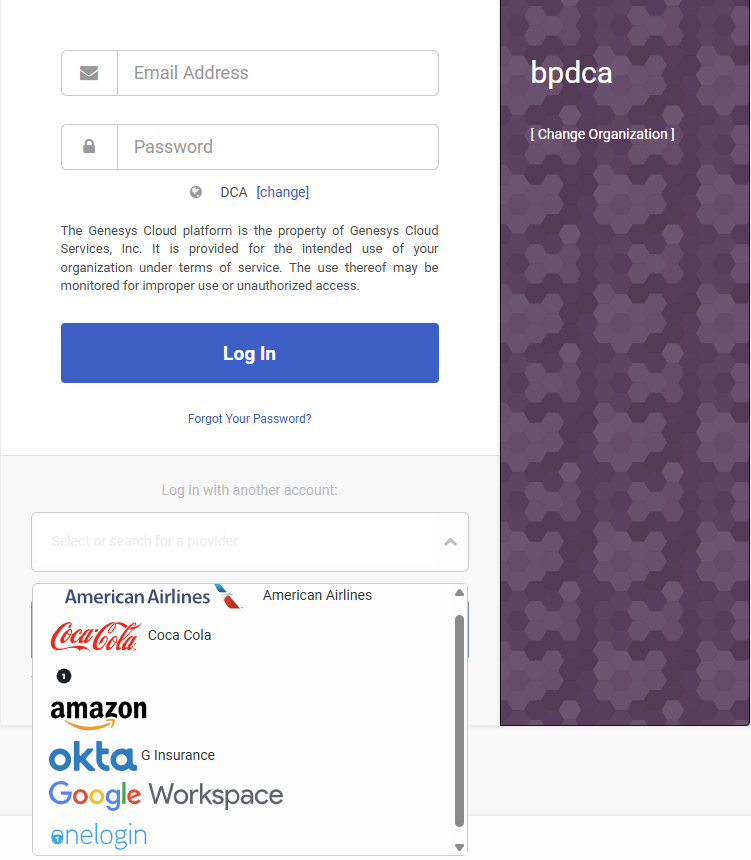
Pour économiser de l'espace, seules six intégrations SSO apparaissent directement sur la page de connexion de Genesys Cloud.
Si vous avez plus de six intégrations SSO, elles apparaissent dans une liste sur la page de connexion.
Créer une intégration SSO
Métadonnées Genesys Cloud
Pour coupler une intégration SSO entre Genesys Cloud et un fournisseur d'identité, configurez les paramètres des deux côtés. Les fournisseurs d'identité vous fournissent un fichier de métadonnées qui contient l'URI de l'émetteur, l'URI de connexion unique et l'URI de déconnexion unique à saisir dans Genesys Cloud lorsque vous configurez le compte du fournisseur d'identité de votre organisation. Vous pouvez générer un fichier de métadonnées SAML avec les métadonnées et les informations de certificat de Genesys Cloud qu'un fournisseur d'identité doit utiliser pour configurer les paramètres de son côté.
Pour créer une intégration SSO :
- Cliquez sur Admin.
- Sous Integrations, cliquez sur Single Sign-on.
- Cliquez sur Menu > IT et intégrations > Single Sign-on.
- Cliquez sur Ajouter un fournisseur d'identité.
- Saisissez le nom que vous souhaitez attribuer à votre intégration.
- Pour afficher le logo sur la page de connexion de Genesys Cloud, sélectionnez Display Name On Login Page.Note: Si vous avez plus de six fournisseurs d'identité, l'option Afficher le nom sur la page de connexion n'est pas disponible.
- Cliquez sur Identity Provider Name et vous pouvez sélectionner l'un des fournisseurs d'identité disponibles, entièrement pris en charge, ou saisir un nouveau nom de fournisseur d'identité.Note: La liste des noms de fournisseurs d'identité contient un ensemble de fournisseurs les plus courants. Si votre fournisseur d'identité ne figure pas dans la liste, vous pouvez l'ajouter en tapant son nom. Après avoir enregistré la configuration, le nouveau fournisseur d'identité apparaît dans la liste.
- Cliquez sur Select logo et téléchargez le fichier image du logo que vous souhaitez afficher sur la page de connexion. Vous pouvez également faire glisser et déposer le fichier image du logo.Note: Le fichier image du logo doit être au format SVG et ne doit pas dépasser 25 Ko.
- Pour importer le fichier de métadonnées que votre fournisseur d'identité vous a envoyé, dans la section Identity Provider Data, cliquez sur Select SAML metadata to import. Vous pouvez également faire glisser le fichier de métadonnées et le déposer.
Après avoir importé le fichier de métadonnées, vous remarquerez que les champs obligatoires sont automatiquement remplis et que le certificat public x509 encodé pour la validation de la signature SAML est disponible.
| Champ | Description |
|---|---|
| URI de l'émetteur | L'identifiant de l'émetteur du fournisseur d'identité. |
| URI d'authentification unique | URL d'authentification unique du fournisseur d'identité. |
| Connexion unique (Single Sign-On Binding) | L'obligation de connexion spécifiée par votre fournisseur d'identité. |
| Signer les demandes d'authentification |
Cochez la case Signer les demandes d'authentification si vous souhaitez ajouter une couche de sécurité supplémentaire pour vérifier que les demandes proviennent d'une source vérifiée. Note: Comme mesure de sécurité supplémentaire, Genesys Cloud vous permet de signer les demandes d'authentification. Une demande d'authentification signée est une demande SAML (Security Assertion Markup Language) qui a été signée numériquement pour garantir son authenticité et son intégrité. |
| URI de déconnexion unique | L'URL de déconnexion spécifiée par votre fournisseur d'identité. |
| Liaison de déconnexion unique | L'obligation de déconnexion spécifiée par votre fournisseur d'identité. Si aucune liaison n'est spécifiée, sélectionnez HTTP Redirect. |
| Format d'identifiant de nom | Le format spécifié par votre fournisseur d'identité. Si le format est inconnu, sélectionnez Unspecified. |
| Certificat |
Certificats X.509 pour la validation des signatures SAML. Les certificats téléchargés apparaissent avec leur date d'expiration. Vous pouvez avoir jusqu'à cinq certificats par configuration SSO. Genesys Cloud choisit le certificat correct lors de la connexion unique et de la déconnexion. Pour télécharger d'autres certificats, cliquez surlick Select certificates to upload et téléchargez le certificat. Vous pouvez également faire glisser le certificat et le déposer. Pour supprimer un certificat, cliquez sur Remove |
- Cliquez sur Sauvegarder.
Données du fournisseur de services Genesys Cloud
Lorsque vous cliquez sur Save, Genesys Cloud génère les métadonnées SAML que votre fournisseur d'identité utilise lors de la configuration de votre compte de fournisseur d'identité.
- Pour télécharger un fichier de métadonnées SAML contenant les métadonnées de Genesys Cloud et les informations sur les certificats qu'un fournisseur d'identité doit utiliser pour configurer les paramètres de son côté, sous Genesys Cloud Metadata, cliquez sur Download Metadata.
- Si vous n'avez besoin que d'un certificat Genesys à envoyer à un fournisseur d'identité, sous Single Logout URI, cliquez sur Download Certificate.
Attributs SAML
Si les attributs SAML supplémentaires suivants sont présents dans l'assertion, Genesys Cloud agit sur les attributs. Les attributs sont sensibles à la casse.
| Nom de l'attribut | Valeur de l'attribut |
|---|---|
| Nom de l'organisation |
|
| Nom du service |
Une URL valide vers laquelle le navigateur doit être redirigé après une authentification réussie, ou l'un des mots clés suivants :
|